GeoDjango and Leaflet.js
Today is the day, when I will start my blog. I would like to publish new posts once a week. The comments and feedback will be pretty much appreciated as I have started blogging in English.
I assume that the Reader knows how to run basic Django application. If this is not the case, I encourage you to start here.
So, let’s start:
First of all, what is GeoDjango?
From official GeoDjango documentation:
GeoDjango intends to be a world-class geographic Web framework. Its goal is to make it as simple as possible to build GIS Web applications and harness the power of spatially enabled data.
To run GeoDjango you have to install some additional packages. In ubuntu you can easily do this way:
$ sudo apt-get install binutils libproj-dev gdal-bin
Gdal-bin package is not necessary but it’s very helpful so I encourage to install it.
Then you need to choose what database you will use with your GeoDjango project. I personally chosen PostgreSQL with PostGIS because it support all of the GeoDjango features according to this table.
After starting project, and making new application add few lines to your settings.py:
DATABASES = {
'default': {
     'ENGINE': 'django.contrib.gis.db.backends.postgis',
     'NAME': 'your_database_name',
     'USER': 'your_user',
     'PASSWORD': 'your_password',
     'HOST': 'localhost',
     'PORT': '5432',
    }
}
and modify INSTALLED_APPS:
INSTALLED_APPS = (
    'django.contrib.admin',
    'django.contrib.auth',
    'django.contrib.contenttypes',
    'django.contrib.sessions',
    'django.contrib.messages',
    'django.contrib.staticfiles',
    'django.contrib.gis',
    'name_of_your_applications' # in my case voivodeships
 )
To actually show some data we need it first. In this project I’ll use shp files and points with coordinates.
There is a lot of sites with free shp files available but I will choose one for Poland. The shapefiles are in zip file. So go and grab them:
wget ftp://91.223.135.109/prg/jednostki_administracyjne.zip
$ mkdir data && unzip jednostki_administracyjne.zip -d data
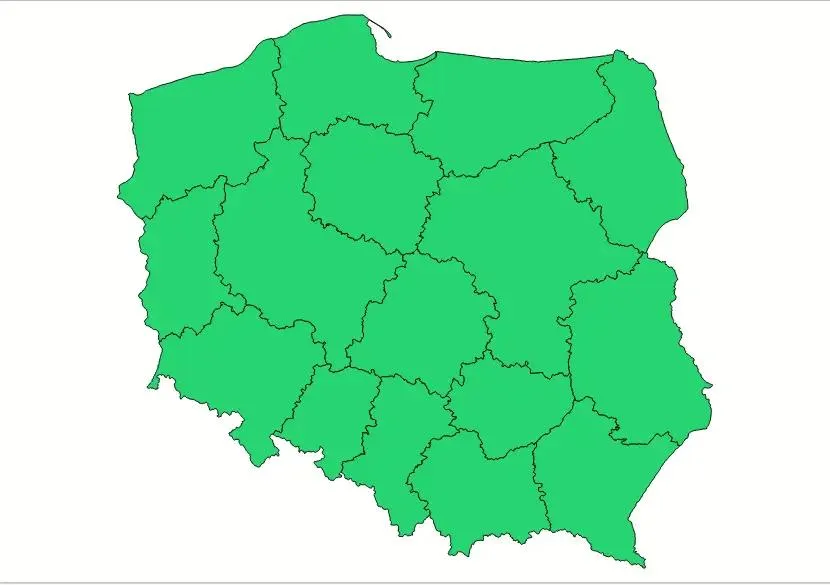
I’m going to use only 1 shapefile from this zip called ‘województwa.shp’ (voivodeships). After unziping you want to examine contents of shapefiles. You can do it in tool like QuantumGIS or use GDAL ogrinfo.
In QGIS this shapefile presents as follows:
Using ogrinfo:
$ ogrinfo -so data/PRG_jednostki_administracyjne_v10/województwa.shp województwa

INFO: Open of `data/PRG_jednostki_administracyjne_v10/województwa.shp'
 using driver `ESRI Shapefile' successful.

Layer name: województwa
Geometry: Polygon
Feature Count: 16
Extent: (171677.555190, 133223.725152) - (861895.746988, 774923.747473)
Layer SRS WKT:
PROJCS["ETRS89 / Poland CS92",
   GEOGCS["ETRS89",
       DATUM["European Terrestrial Reference System 1989",
           SPHEROID["GRS 1980",6378137.0,298.257222101],
           TOWGS84[0,0,0]],
       PRIMEM["Greenwich",0.0],
       UNIT["Decimal Degree",0.017453292519943295]],
   PROJECTION["Transverse_Mercator"],
   PARAMETER["latitude_of_origin",0.0],
   PARAMETER["central_meridian",18.999999999999982],
   PARAMETER["scale_factor",0.9993],
   PARAMETER["false_easting",500000.0],
   PARAMETER["false_northing",-5300000.0],
   UNIT["Meter",1.0],
   AUTHORITY["EPSG","2180"]]
   iip_przest: String (255.0)
   iip_identy: String (255.0)
   iip_wersja: String (255.0)
   jpt_sjr_ko: String (255.0)
   jpt_kod_je: String (255.0)
   jpt_nazwa_: String (255.0)
   jpt_nazw01: String (255.0)
   jpt_organ_: String (255.0)
   jpt_orga01: String (255.0)
   jpt_jor_id: Real (32.0)
   wazny_od: Date (10.0)
   wazny_do: Date (10.0)
   jpt_wazna_: String (255.0)
   wersja_od: Date (10.0)
   wersja_do: Date (10.0)
   jpt_powier: Real (33.16)
   jpt_kj_iip: String (255.0)
   jpt_kj_i01: String (255.0)
   jpt_kj_i02: String (255.0)
   jpt_kod_01: String (255.0)
   id_bufora_: Real (32.0)
   id_bufor01: Real (32.0)
   id_technic: Real (32.0)
   jpt_opis: String (255.0)
   jpt_sps_ko: String (255.0)
   gra_ids: String (255.0)
   status_obi: String (255.0)
   opis_bledu: String (255.0)
   typ_bledu: String (255.0)
We can make model representing this data in our application by hand but it’s django so you can type:
$ ./manage.py ogrinspect data/PRG_jednostki_administracyjne_v10/województwa.shp Voivodeship --mapping --srid 2180 --multi >> voivodeships/models.py
Where —mapping tells you to generate mapping used to load data from shapefile, —srid sets the SRID for the geographic field and —multi sets geographic field to MultiPolygonField
Our voivodeships/models.py will look like this:
from __future__ import unicode_literals
# This is an auto-generated Django model module created by ogrinspect.
from django.contrib.gis.db import models

class Voivodeship(models.Model):
    iip_przest = models.CharField(max_length=255)
    iip_identy = models.CharField(max_length=255)
    iip_wersja = models.CharField(max_length=255)
    jpt_sjr_ko = models.CharField(max_length=255)
    jpt_kod_je = models.CharField(max_length=255)
    jpt_nazwa_field = models.CharField(max_length=255)
    jpt_nazw01 = models.CharField(max_length=255)
    jpt_organ_field = models.CharField(max_length=255)
    jpt_orga01 = models.CharField(max_length=255)
    jpt_jor_id = models.FloatField()
    wazny_od = models.DateField()
    wazny_do = models.DateField()
    jpt_wazna_field = models.CharField(max_length=255)
    wersja_od = models.DateField()
    wersja_do = models.DateField()
    jpt_powier = models.FloatField()
    jpt_kj_iip = models.CharField(max_length=255)
    jpt_kj_i01 = models.CharField(max_length=255)
    jpt_kj_i02 = models.CharField(max_length=255)
    jpt_kod_01 = models.CharField(max_length=255)
    id_bufora_field = models.FloatField()
    id_bufor01 = models.FloatField()
    id_technic = models.FloatField()
    jpt_opis = models.CharField(max_length=255)
    jpt_sps_ko = models.CharField(max_length=255)
    gra_ids = models.CharField(max_length=255)
    status_obi = models.CharField(max_length=255)
    opis_bledu = models.CharField(max_length=255)
    typ_bledu = models.CharField(max_length=255)
    geom = models.MultiPolygonField(srid=2180)

    def __str__(self):
        return '{}'.format(self.jpt_nazwa_field)

    def __unicode__(self):
        return '{}'.format(self.jpt_nazwa_field)

# Auto-generated `LayerMapping` dictionary for Voivodeship model
voivodeship_mapping = {
    'iip_przest' : 'iip_przest',
    'iip_identy' : 'iip_identy',
    'iip_wersja' : 'iip_wersja',
    'jpt_sjr_ko' : 'jpt_sjr_ko',
    'jpt_kod_je' : 'jpt_kod_je',
    'jpt_nazwa_field' : 'jpt_nazwa_',
    'jpt_nazw01' : 'jpt_nazw01',
    'jpt_organ_field' : 'jpt_organ_',
    'jpt_orga01' : 'jpt_orga01',
    'jpt_jor_id' : 'jpt_jor_id',
    'wazny_od' : 'wazny_od',
    'wazny_do' : 'wazny_do',
    'jpt_wazna_field' : 'jpt_wazna_',
    'wersja_od' : 'wersja_od',
    'wersja_do' : 'wersja_do',
    'jpt_powier' : 'jpt_powier',
    'jpt_kj_iip' : 'jpt_kj_iip',
    'jpt_kj_i01' : 'jpt_kj_i01',
    'jpt_kj_i02' : 'jpt_kj_i02',
    'jpt_kod_01' : 'jpt_kod_01',
    'id_bufora_field' : 'id_bufora_',
    'id_bufor01' : 'id_bufor01',
    'id_technic' : 'id_technic',
    'jpt_opis' : 'jpt_opis',
    'jpt_sps_ko' : 'jpt_sps_ko',
    'gra_ids' : 'gra_ids',
    'status_obi' : 'status_obi',
    'opis_bledu' : 'opis_bledu',
    'typ_bledu' : 'typ_bledu',
    'geom' : 'MULTIPOLYGON',
}
Where under Voivodeship model we have all fields from shp file and in
voivodeship_mappingwe got proper mapping for loading data. I added
__str__ and __unicode__ for convenience.
Let’s add an admin for our voivodeship application by editing admin.py:
from django.contrib.gis import admin
from .models import Voivodeship

admin.site.register(Voivodeship, admin.OSMGeoAdmin)
After making and executing migrations to your database we can load shapes with voivodeships. To do this let’s create load.py with following contents:
import os
from django.contrib.gis.utils import LayerMapping
from .models import Voivodeship

voivodeship_mapping = {
    'iip_przest' : 'iip_przest',
    'iip_identy' : 'iip_identy',
    'iip_wersja' : 'iip_wersja',
    'jpt_sjr_ko' : 'jpt_sjr_ko',
    'jpt_kod_je' : 'jpt_kod_je',
    'jpt_nazwa_field' : 'jpt_nazwa_',
    'jpt_nazw01' : 'jpt_nazw01',
    'jpt_organ_field' : 'jpt_organ_',
    'jpt_orga01' : 'jpt_orga01',
    'jpt_jor_id' : 'jpt_jor_id',
    'wazny_od' : 'wazny_od',
    'wazny_do' : 'wazny_do',
    'jpt_wazna_field' : 'jpt_wazna_',
    'wersja_od' : 'wersja_od',
    'wersja_do' : 'wersja_do',
    'jpt_powier' : 'jpt_powier',
    'jpt_kj_iip' : 'jpt_kj_iip',
    'jpt_kj_i01' : 'jpt_kj_i01',
    'jpt_kj_i02' : 'jpt_kj_i02',
    'jpt_kod_01' : 'jpt_kod_01',
    'id_bufora_field' : 'id_bufora_',
    'id_bufor01' : 'id_bufor01',
    'id_technic' : 'id_technic',
    'jpt_opis' : 'jpt_opis',
    'jpt_sps_ko' : 'jpt_sps_ko',
    'gra_ids' : 'gra_ids',
    'status_obi' : 'status_obi',
    'opis_bledu' : 'opis_bledu',
    'typ_bledu' : 'typ_bledu',
    'geom' : 'MULTIPOLYGON',
}

voivodeship_shp = os.path.abspath(os.path.join('data', 'PRG_jednostki_administracyjne_v10', 'województwa.shp'))

def run(verbose=True):
    lm = LayerMapping(Voivodeship, voivodeship_shp, voivodeship_mapping,
                      transform=False, encoding='iso-8859-1')

    lm.save(strict=True, verbose=verbose)
We don’t need to provide any transform in LayerMapping call because a correct srid is already there. After saving the file run load.py from django shell:
>>> from voivodeships import load
>>> load.run()
# a lot of output here...
# IntegrityError
We got this IntegrityError because our models fields does not allow
empty values in wazny_od field and this shp has some empty values. To
avoid such errors we can edit Voivodeship model fields:
# rest of code here ...

class Voivodeship(models.Model):
    #...
    wazny_od = models.DateField(null=True, blank=True)
    wazny_do = models.DateField(null=True, blank=True)
    #...
    wersja_od = models.DateField(null=True, blank=True)
    wersja_do = models.DateField(null=True, blank=True)
    #...

# rest of code here...
Rerun ./manage.py makemigrations and ./manage.py migrate then try one more time to run load.py
from voivodeships import load
load.run()
# Saved: Voivodeship object
# 15 times more
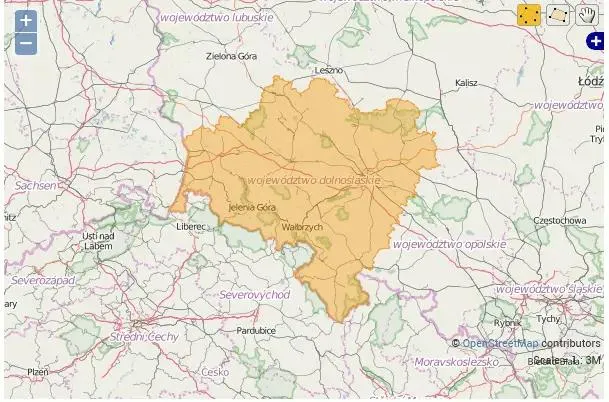
When you run ./manage.py runserver and go to the admin site you can see that geometric field is displayed in form of a map:
To make our map more robust let’s add additional data (points). There are 16 points in capitals of polish voivodeships in CSV file.
"Rzeszów","50.04015435","22.006124806535"
"Kraków","50.0591381","19.9372696"
"Katowice","50.244967474000475","19.02679182200046"
"Opole","50.66800573900048","17.91971986900046"
"Wrocław","51.1071531","17.0230635"
"Zielona Góra","51.9391761","15.5120624461033"
"Poznań","52.4299047","16.9352252"
"Łódź","51.7471563","19.5665896"
"Kielce","50.8961522","20.5798348952528"
"Lublin","51.250969","22.5547430471451"
"Warszawa","52.2458285","21.2234804"
"Białystok","53.13074825","23.1708377413392"
"Olsztyn","53.783197","20.4918318"
"Toruń","53.0129269","18.6040463"
"Gdańsk","54.37834175","18.5866973556132"
"Szczecin","53.43813","14.5423387"
Let’s make additional model for points:
class Point(models.Model):
    name = models.CharField(max_length=200)
    geom = models.PointField('longitude/latitude', blank=True, null=True)
    objects = models.GeoManager()

def __str__(self):
    return self.name

def __unicode__(self):
    return self.name
Then to admin.py:
from .models import Point
admin.site.register(Point, admin.OSMGeoAdmin)
And to add them to GeoDjango lets add few lines to load.py:
from django.contrib.gis import geos
from .models import Point

point_csv = os.path.abspath(os.path.join('data', 'points.csv'))
def point_load():
    with open(point_csv) as point_file:
        for line in point_file:
            name, lon, lat = line.split(',')
            point = "POINT(%s %s)" % (lon.strip(), lat.strip())
            Point.objects.create(name=name, geom=geos.fromstr(point))
Then import load.py in django shell and run point_load().
Ok, that’s all for this post. Stay tuned for the next part where I show how display data on actual map.
After loading data to GeoDjango application now, it’s time to present it
to the user. You can use django template tag like {{object}} but I
think it’s better to provide api endpoints. I will be using GeoDjango
builtin GeoJSON serializer. To do this declare new views in views.py:
from django.http import HttpResponse
from django.core.serializers import serialize
from .models import Point, Voivodeship

def points_view(request):
    points_as_geojson = serialize('geojson', Point.objects.all())
    return HttpResponse(points_as_geojson, content_type='json')

def wojewodztwa_view(request):
    voivodeships_as_geojson = serialize('geojson', Voivodeship.objects.all())
    return HttpResponse(voivodeships_as_geojson, content_type='json')
Also add following setting into settings.py:
SERIALIZATION_MODULES = {
     "geojson": "django.contrib.gis.serializers.geojson",
  }
GeoJSON is open format for encoding geographical data. It’s based on JSON.
Then add lines to urls.py:
from django.conf.urls import include, url
from django.contrib import admin
from voivodeships.views import points_view, voivodeships_view

urlpatterns = [
    url(r'^admin/', include(admin.site.urls)),
    url(r'^points.data/', points_view, name='points'),
    url(r'^voivodeships.data/', voivodeships_view, name='voivodeships'),
]
As you can see GeoDjango displays data from database in GeoJSON:
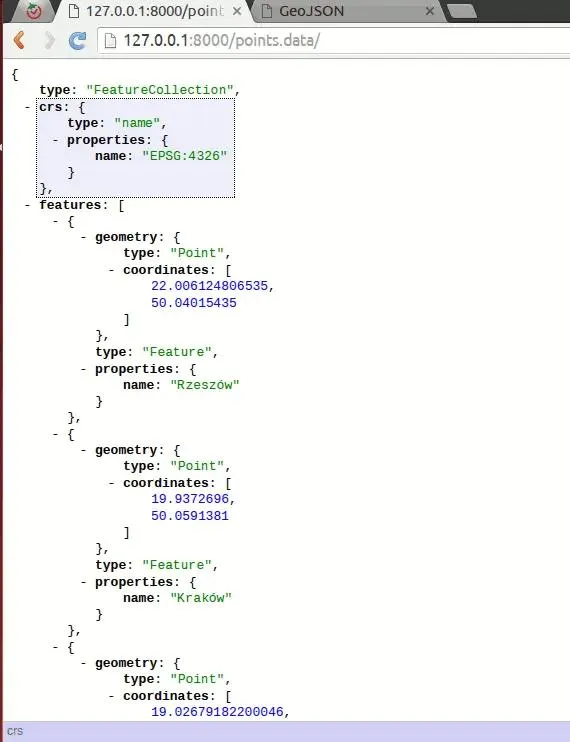
It’s nice but end user need to see results on the map not in JSON format so I use Leaflet.js.
You can download leaflet.js from the web page but there is a better way: django-leaflet. It’s django application with allows you embed leaflet to django project. Install it by:
$ pip install django-leaflet
Then make sure that leaflet is added to INSTALLED_APPS in
settings.py:
INSTALLED_APPS = (
  # other applications
  leaflet
)
Let’s add main page view to GeoDjango application in views.py:
from django.views.generic import TemplateView

class MainPageView(TemplateView):
    template_name = 'voivodeships/index.html'
And to urls.py:
from voivodeships.views import MainPageView

urlpatterns = [# rest of urls
               url(r'^$', MainPageView.as_view()),]
After this add new index.html under
voivodeships/templates/voivodeships/index.html with this content:
<html>
  {% load leaflet_tags %}
  <head>
    {% leaflet_js %} {% leaflet_css %}
  </head>
  <body>
    {% leaflet_map "poland" %}
  </body>
</html>
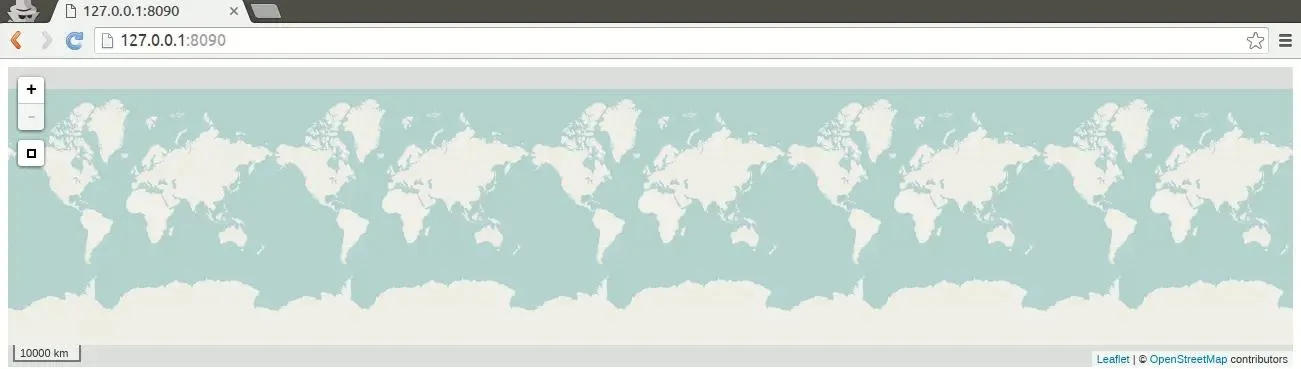
And going to the web page with running GeoDjango application you can see map:
Thanks to django-leaflet you can control behavior of all maps. Let add
the following content to end of settings.py:
LEAFLET_CONFIG = {
  'DEFAULT_CENTER': (52.00,20.00),
  'DEFAULT_ZOOM': 6,
  'MIN_ZOOM': 1,
  'MAX_ZOOM': 20,
}
But still map is not taking full space in the web page so let’s add more CSS lines to fix that in index.html:
<head>
  <style media="screen">
    #poland {
      width: 100%;
      height: 100%;
    }
  </style>
  <!-- Rest of html -->
</head>
One of the Leaflet.js strong points is huge extensions database. In this project I will use few of them including: leaflet-ajax, leaflet-spin, markercluster. It’s up to you how you want to install it. I will use bower for that:
$ bower install leaflet-ajax leaflet-spin leaflet.markerculster
Add STATICFILES_DIRS to settings.py:
STATICFILES_DIRS = (
    os.path.join(BASE_DIR, 'static'),
)
After installation got to index.html and use these plugins:
{% load static %}
<head>
  <!-- style tag and django-leaflet tag here -->
  <script src="{% static 'leaflet-ajax/dist/leaflet.ajax.min.js' %}"></script>
  <script src="{% static 'spin.js/spin.min.js' %}"></script>
  <script src="{% static 'leaflet-spin/leaflet.spin.js' %}"></script>
</head>
<body>
  <script type="text/javascript">
    function map_init_basic(map, options) {
      var geojsonPointLayer = new L.GeoJSON.AJAX("{% url 'points' %}", {
        onEachFeature: function (feature, layer) {
          layer.bindPopup(feature.properties.name.toString());
        },
      });
      geojsonPointLayer.addTo(map);

      var geojsonVoivodeshipsLayer = new L.GeoJSON.AJAX(
        "{% url 'voivodeships' %}",
        {
          onEachFeature: function (feature, layer) {
            layer.bindPopup(feature.properties.jpt_nazwa_field.toString());
          },
        },
      );
      geojsonVoivodeshipsLayer.addTo(map);
    }
  </script>
  {% leaflet_map "poland" callback="window.map_init_basic" %}
</body>
I added new function map_init_basic which is a callback for
django-leaflet tag. Then thanks to leaflet-ajax I get points and
voivodeships GeoJSONs from GeoDjango. Moreover, I use function from
leaflet.js: onEachFeature. This function add popup with the name of
point or voivodeship.
There is one problem. GeoJSON with voivodeship is so accurate that deserializing takes a lot of time (about 41 sec). So one of the solution is to dump GeoJSON to cache, I will use Redis as a cache database.
First, install and check if Redis is working by:
$ sudo apt-get install redis-server
$ redis-cli ping PONG
Then it’s time to install python bindings:
$ pip install redis
$ pip install django-redis-cache
After this adjust some settings in settings.py:
MIDDLEWARE_CLASSES = [
    'django.middleware.cache.UpdateCacheMiddleware',
    # ... another middlewares
    'django.middleware.common.CommonMiddleware',
    # ... rest of middlewares
    'django.middleware.cache.FetchFromCacheMiddleware',
]

CACHES = {
    'default': {
        'BACKEND': 'redis_cache.RedisCache',
        'LOCATION': '127.0.0.1:6379',
    },
}
What is important in MIDDLEWARE_CLASSES is order:
UpdateCacheMiddleware should go before CommonMiddleware and
FetchFromCacheMiddleware is supposed to be last.
Lastly, add cache to voivodeships_view in views.py:
from django.core.cache import cache

def voivodeships_view(request):
    redis_key = 'voivodeships'
    voivodeships = cache.get(redis_key)  # getting value for given key from redis
    if not voivodeships:
       voivodeships = serialize('geojson', Voivodeship.objects.all())
       cache.set(redis_key, voivodeships)  # if not GeoJSON is not in cache set it
    return HttpResponse(voivodeships, content_type='json')
Right now GeoJSON will be loaded from the database. After reloading the web page, django will get results from cache.
That’s all: you have working GeoDjango application. The github repo is under this link
Update 08.01.16:
- Fixing grammar errors. Thank you Adrianna!
Update 28.06.18:
If you want your views to work with Django 2.0 you can use this snippet:
import json
from django.http import JsonResponse
from django.core.serializers import serialize
from .models import Point

def points_view(request):
    points_as_geojson = serialize( 'geojson',Point.objects.all())
    return JsonResponse(json.loads(points_as_geojson))
Thanks to Phyo Min Htwe for providing this piece of code!